
Connect Servers & HPC
Choose between Cloud, Desktop, and CLI setups and connect Drylab to your servers, HPC, or Slurm cluster over SSH.
Start with Section 1 to choose your setup. Then follow Section 2 for Desktop or Section 3 for CLI. You only need one walkthrough.
Desktop configures SSH/Slurm in Settings. CLI configures SSH/Slurm during installation. Both walkthroughs finish with a connection check before the shared guidance on files and jobs.
The CLI walkthrough doesn't use the Desktop App: it installs a local runtime on a server that you then use from Drylab in your browser.
1. Choose your setup
Start with the row that matches your files and available machines. Then choose one walkthrough: Desktop in Section 2 or CLI in Section 3.
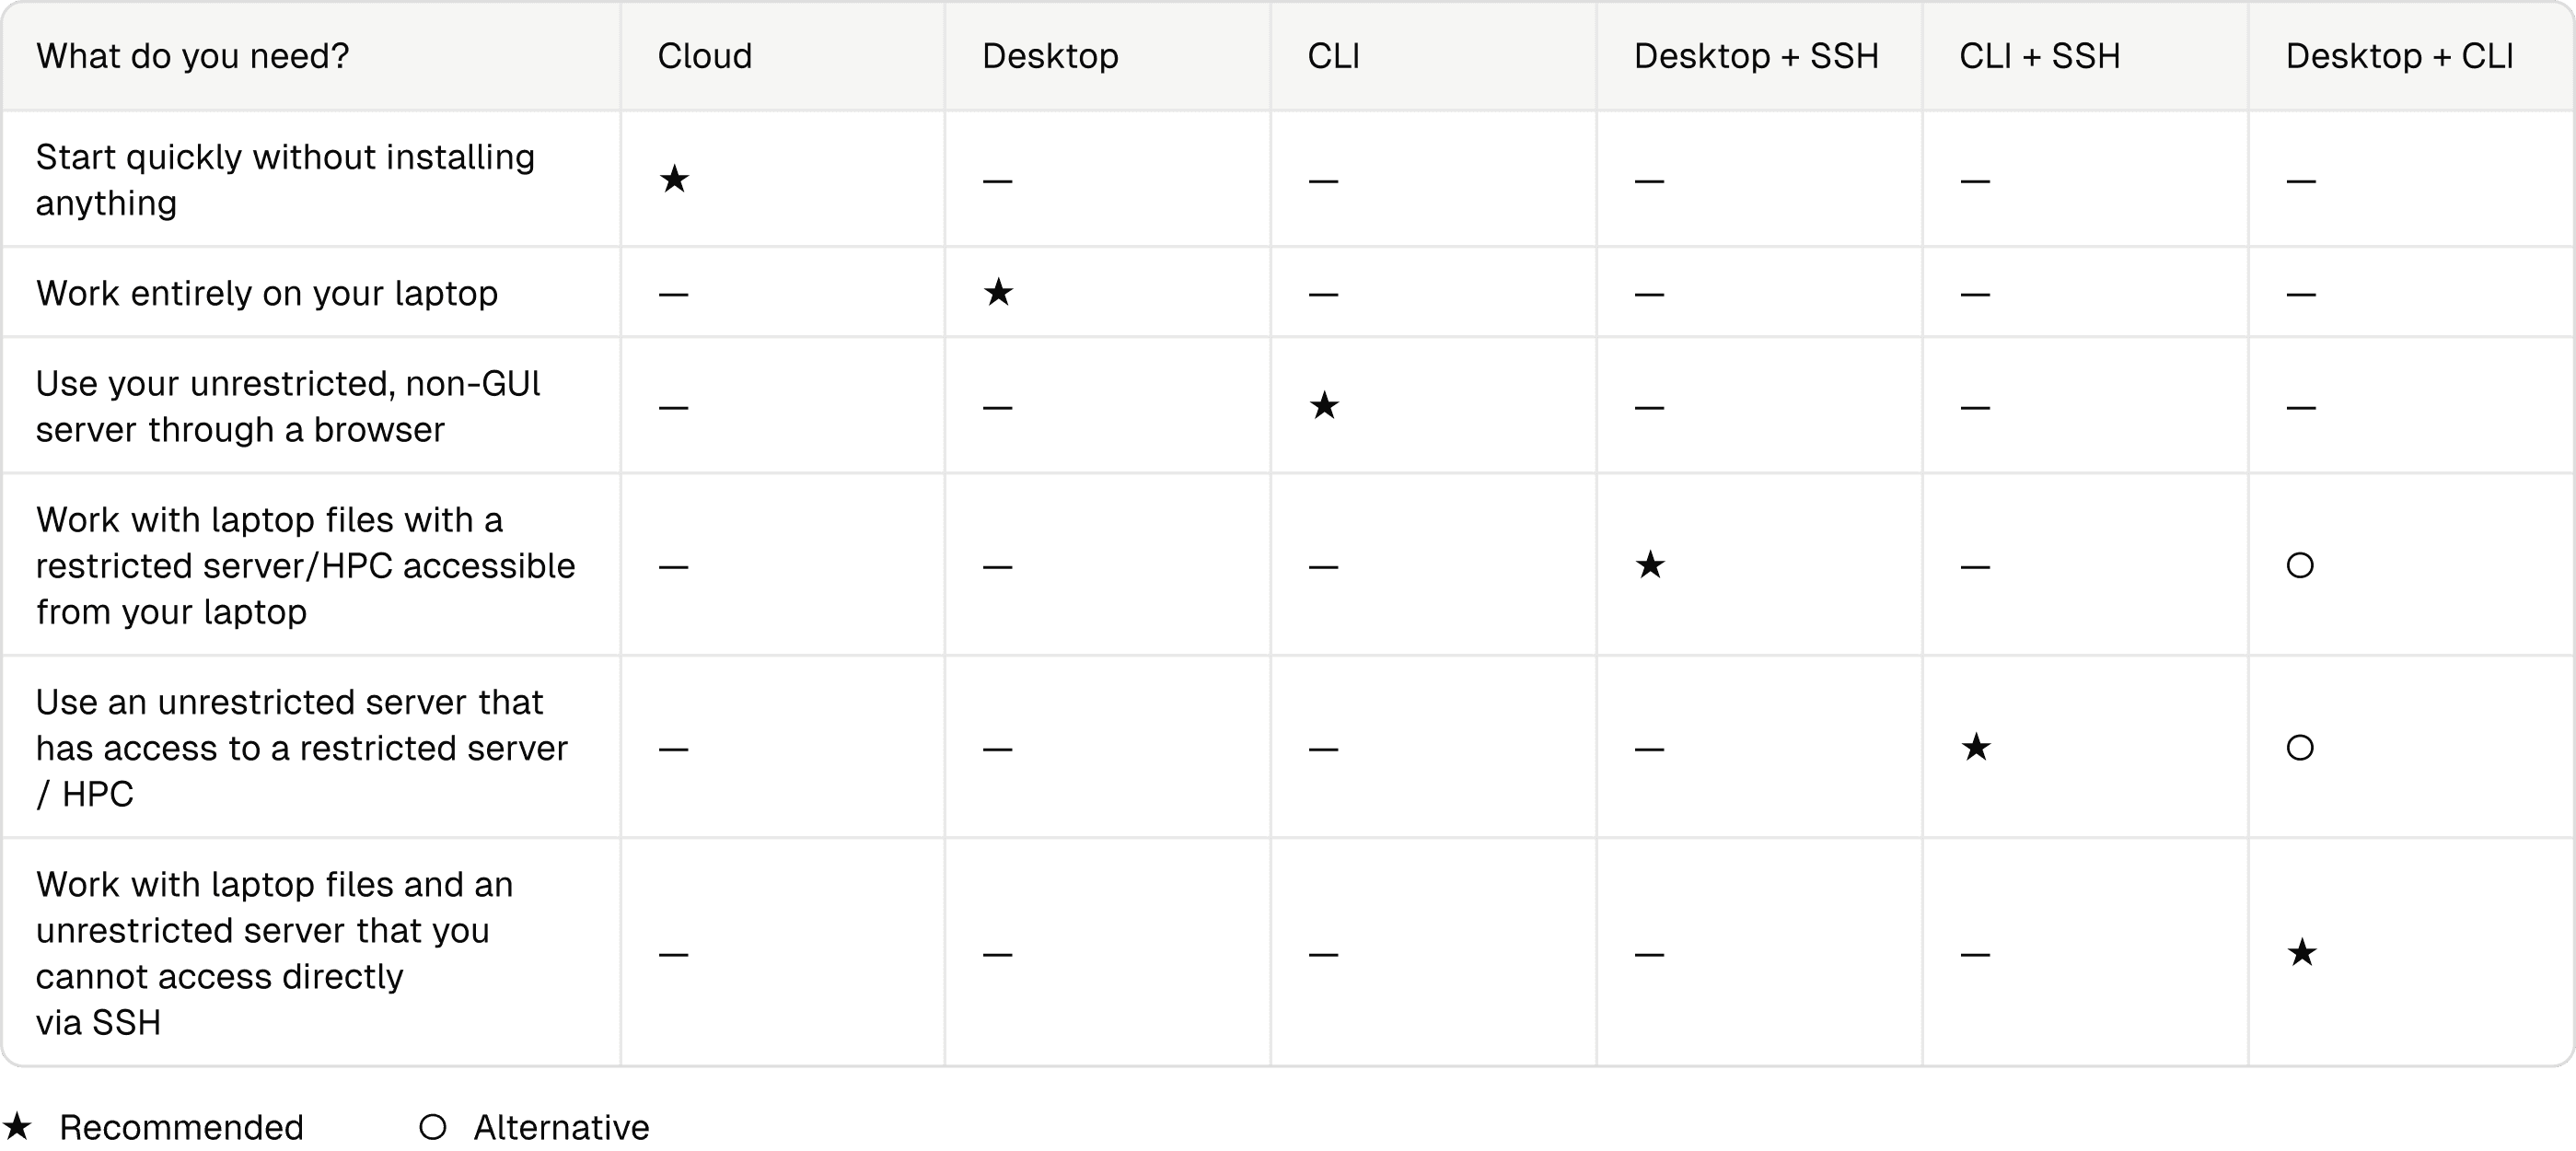
Server can also mean an HPC system or cluster. An unrestricted server permits the Drylab runtime installation and required connectivity. A restricted server is accessed through SSH and may limit installation or network access.
Where your analysis runs
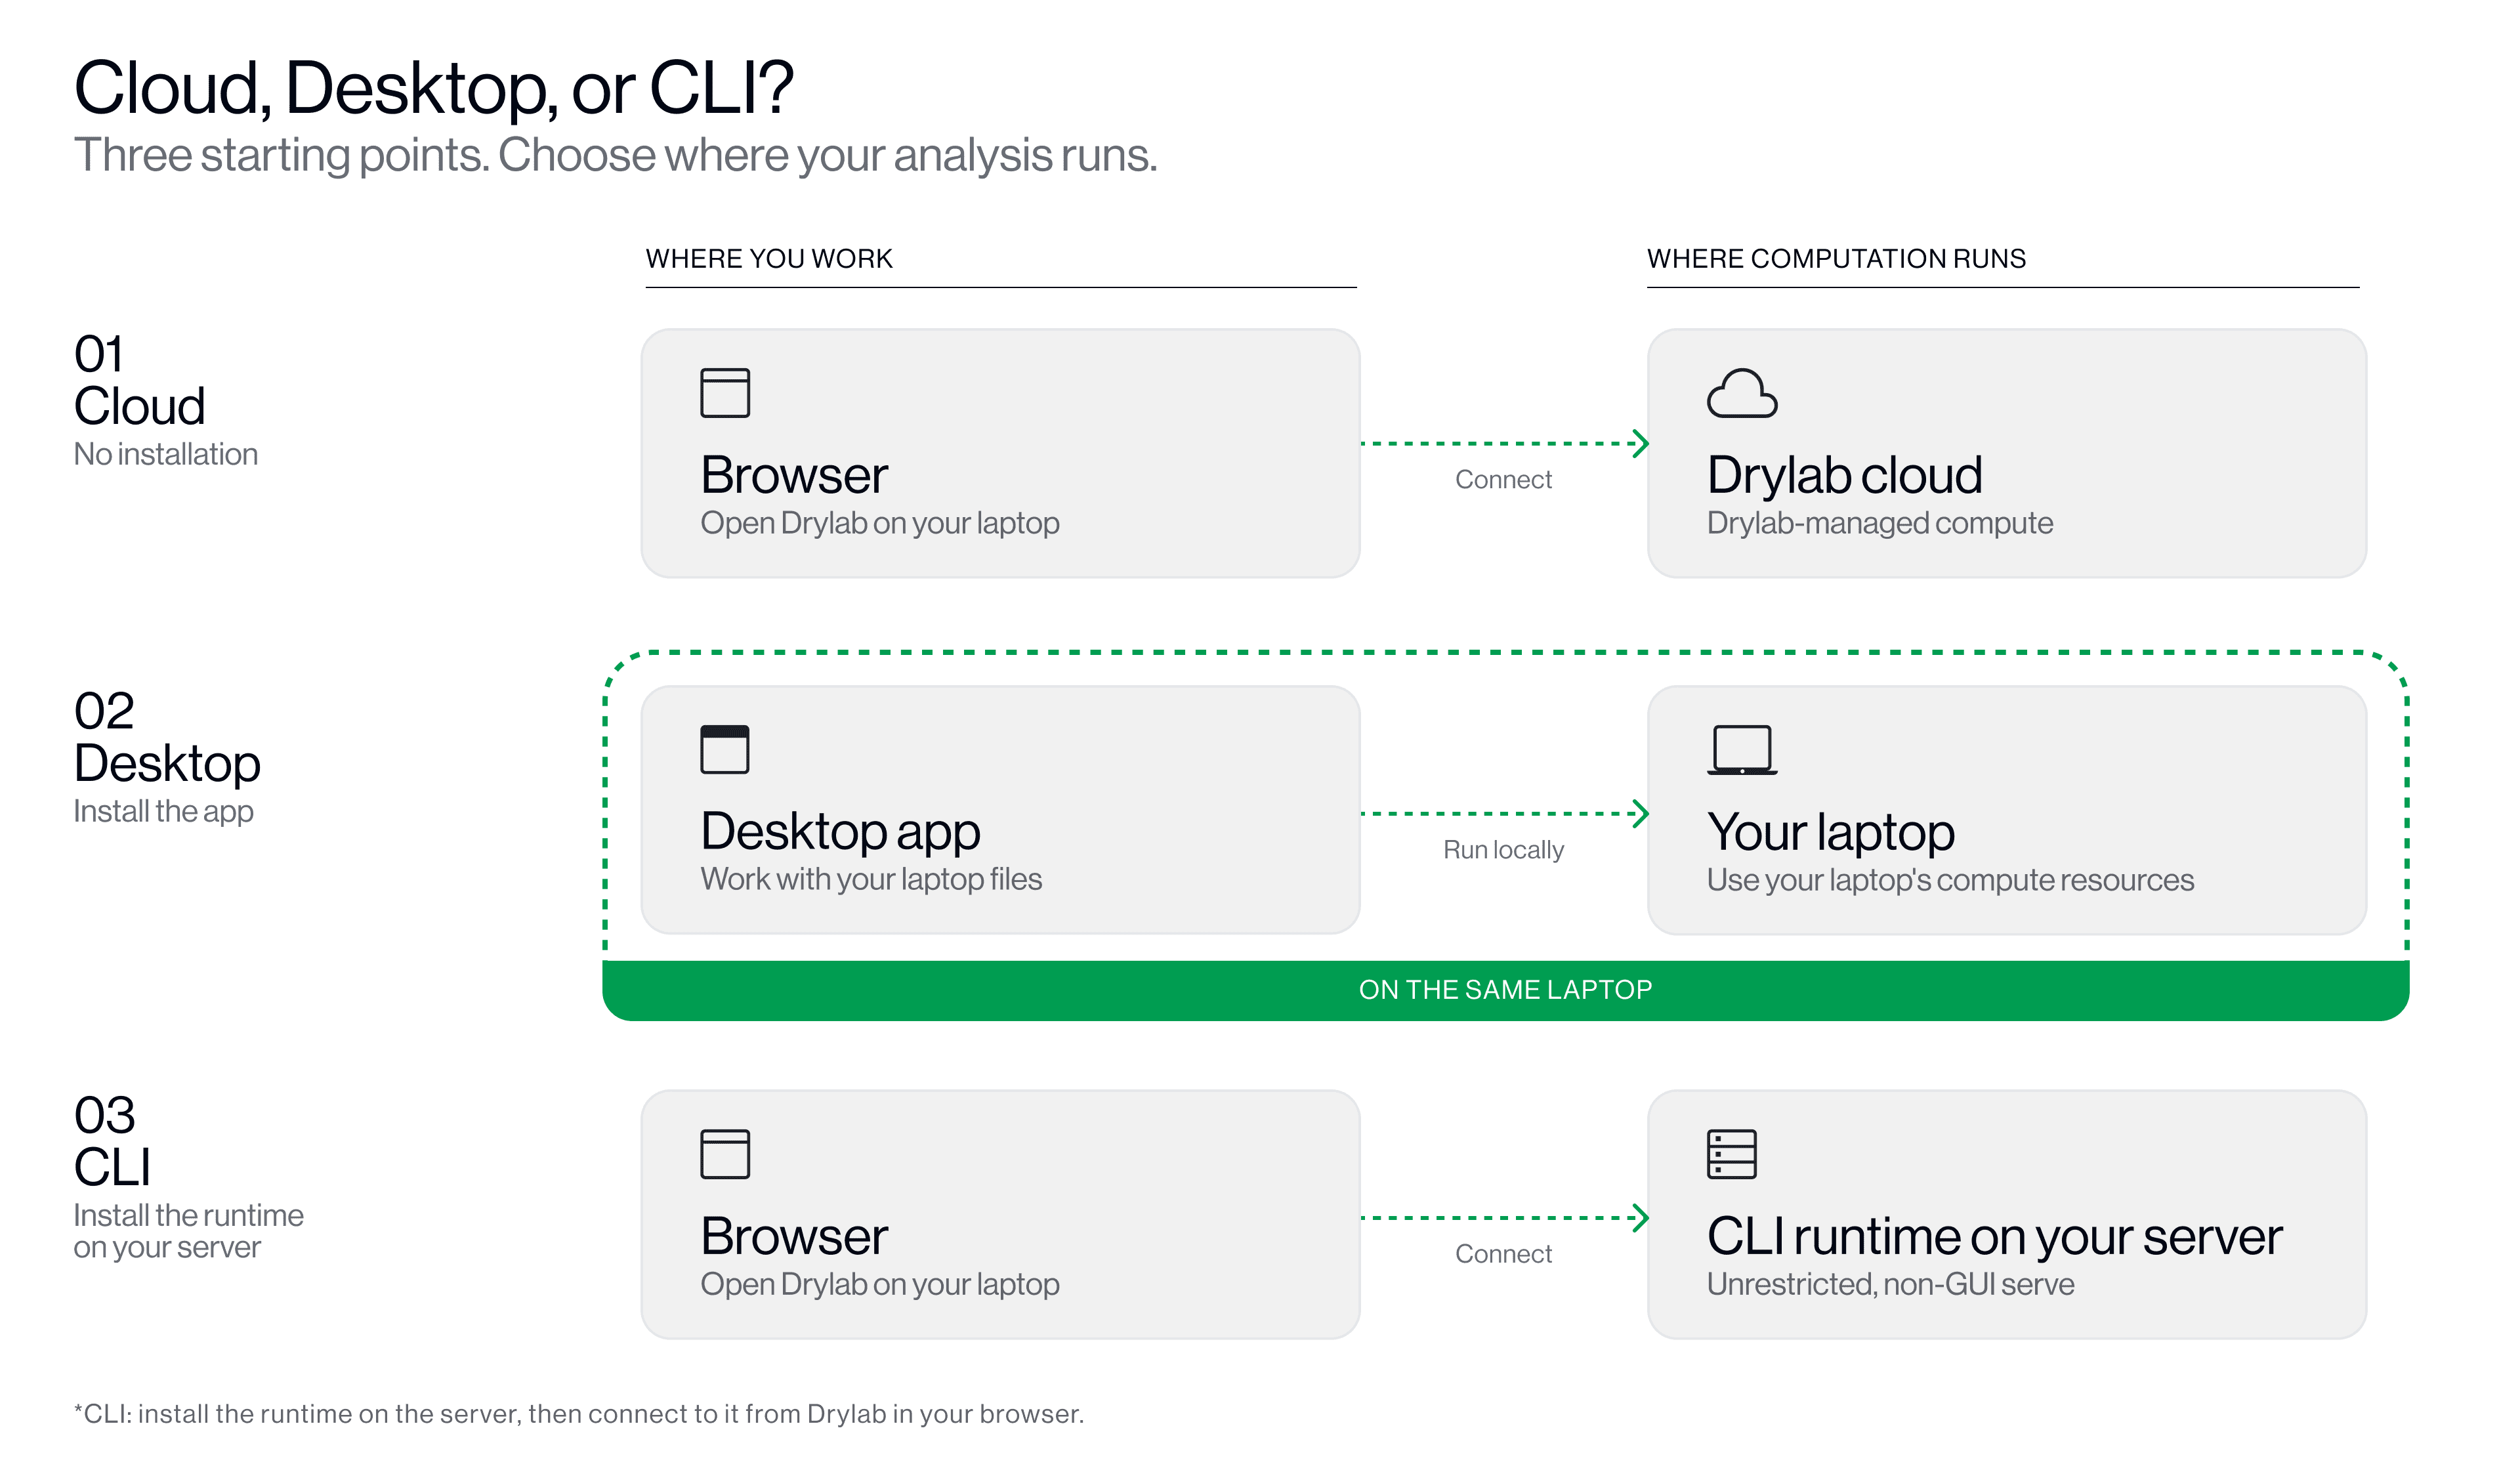
Cloud uses Drylab-managed compute; Desktop runs on your laptop; CLI runs on your unrestricted server.
Connect to a restricted server or HPC
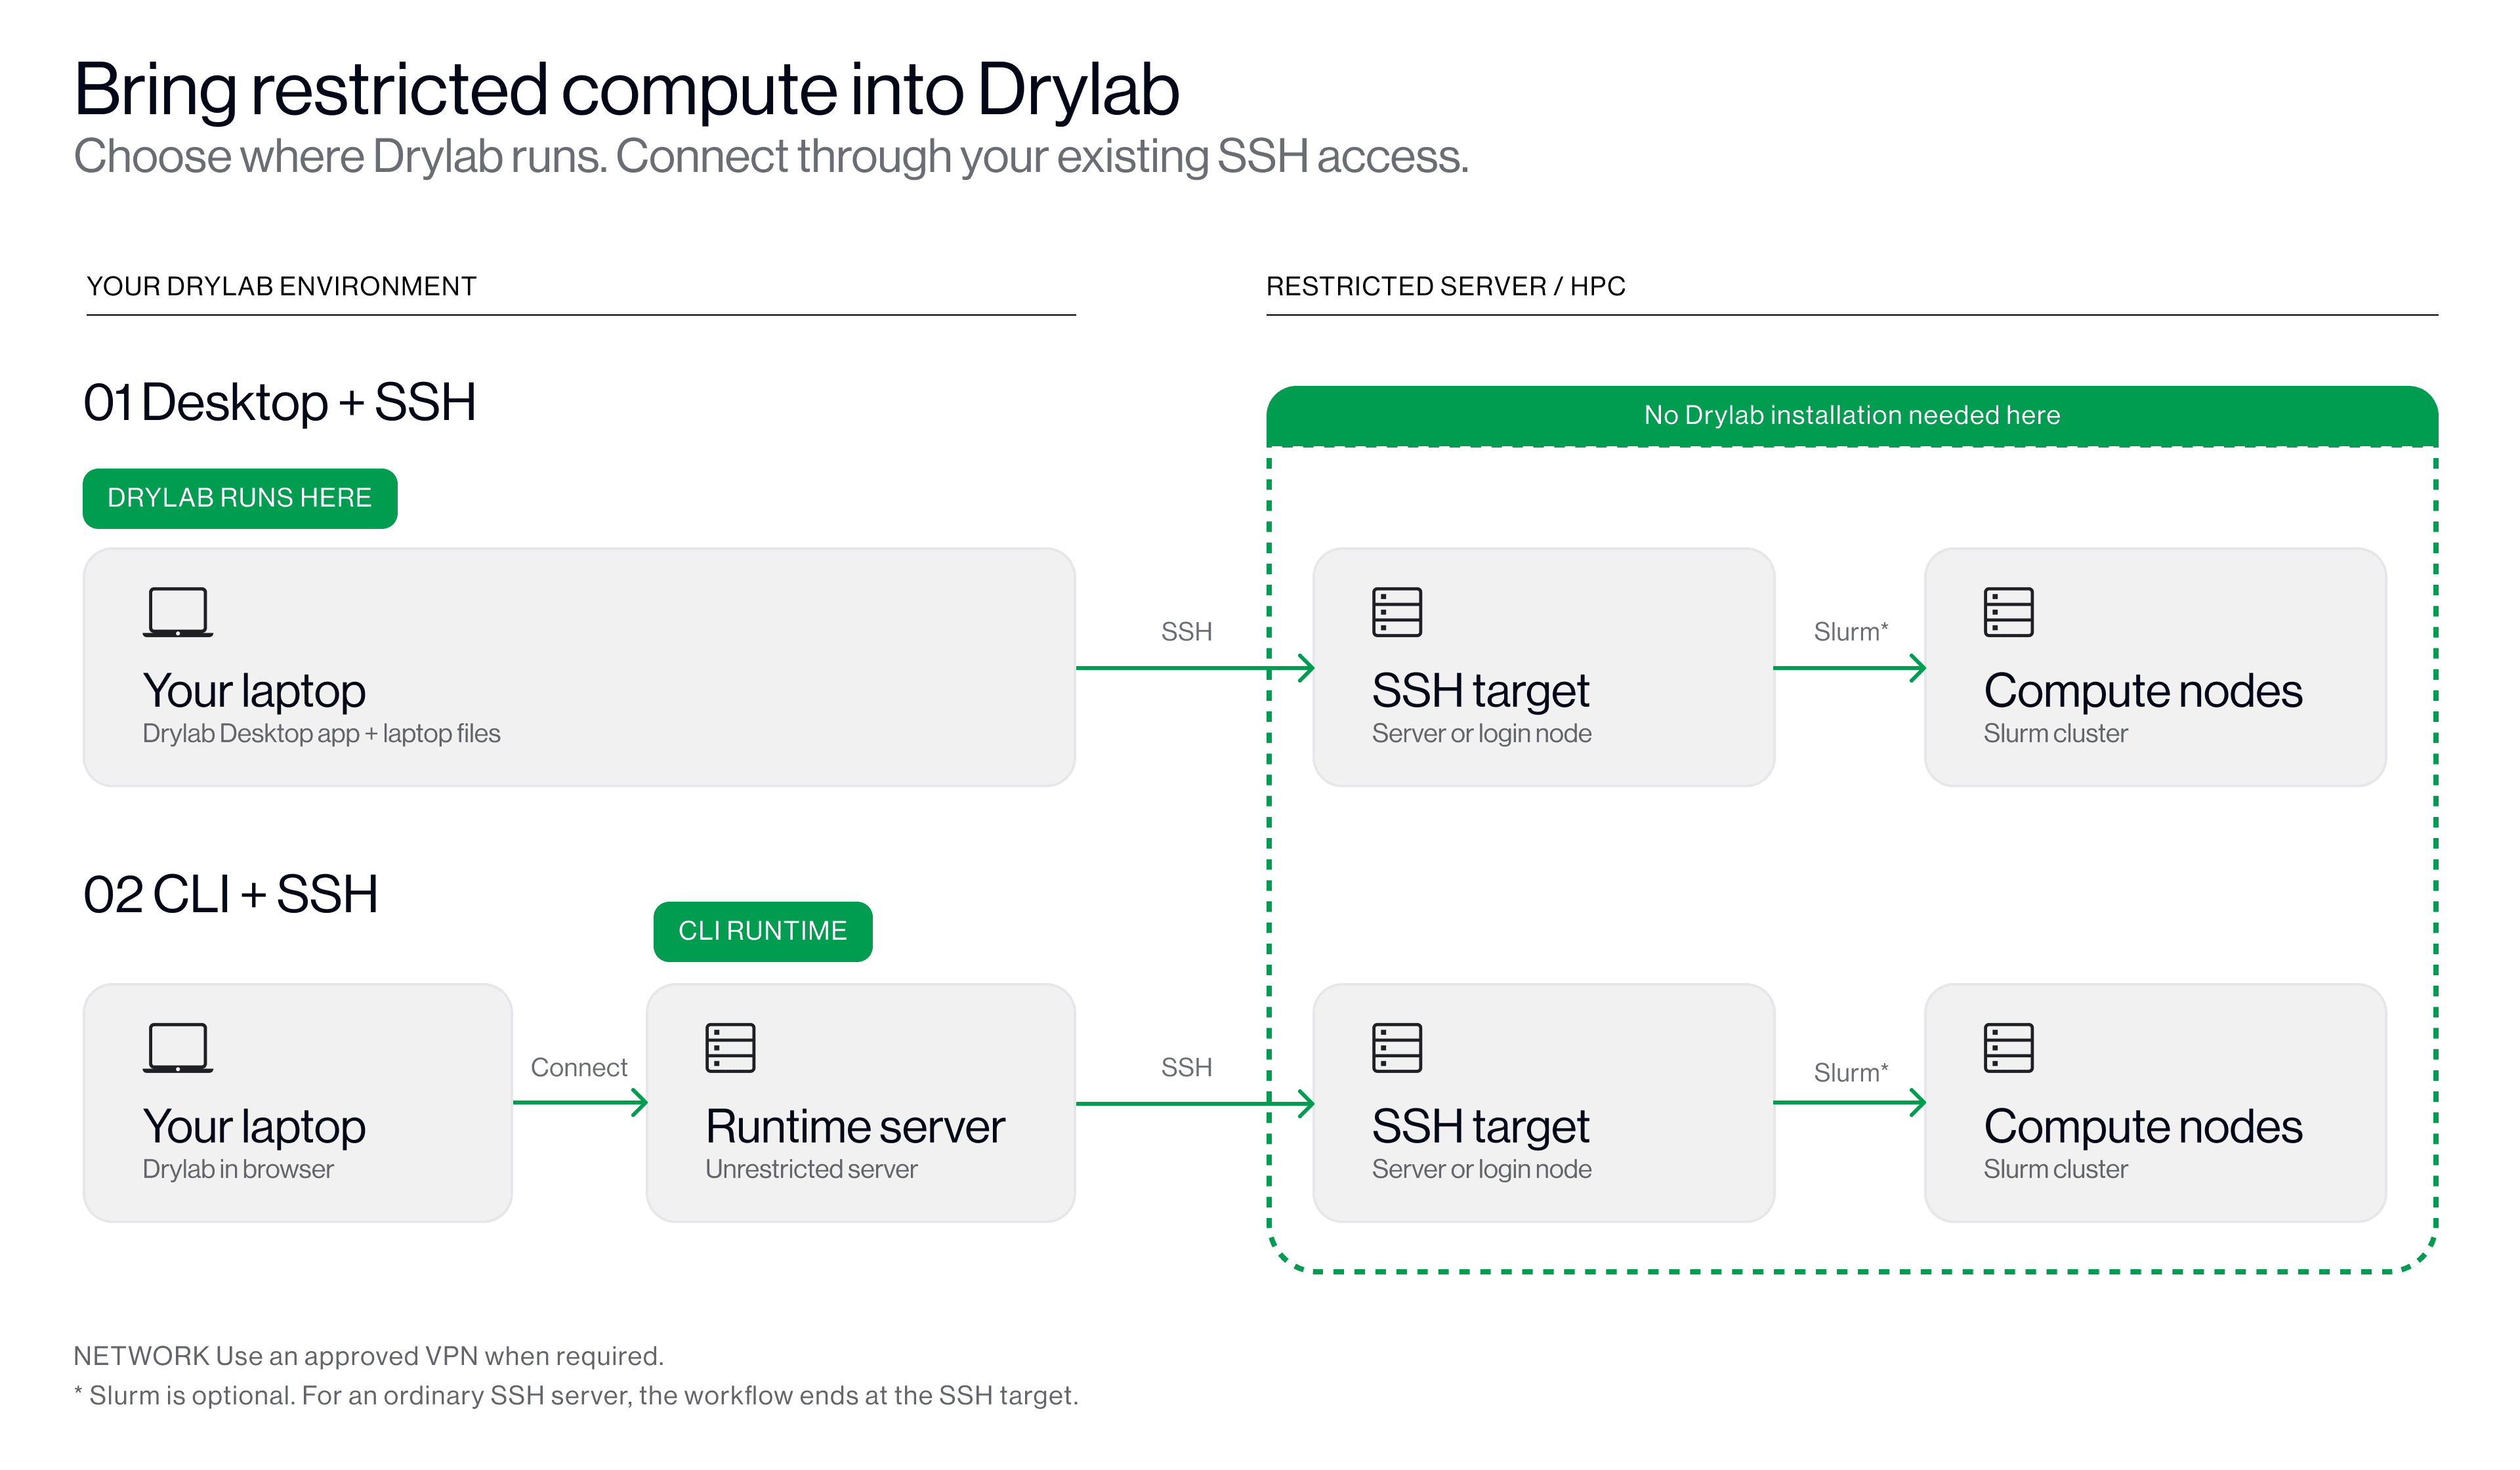
Desktop + SSH connects from your laptop; CLI + SSH connects from your runtime server.
Check the route: your laptop must reach the target for Desktop + SSH; your runtime server must reach it for CLI + SSH. Transfer laptop files to an accessible server when using CLI + SSH.
Slurm is optional: use SSH for ordinary servers and the scheduler for Slurm compute jobs. The restricted target does not need a Drylab installation for the SSH connection.
Connection paths at a glance
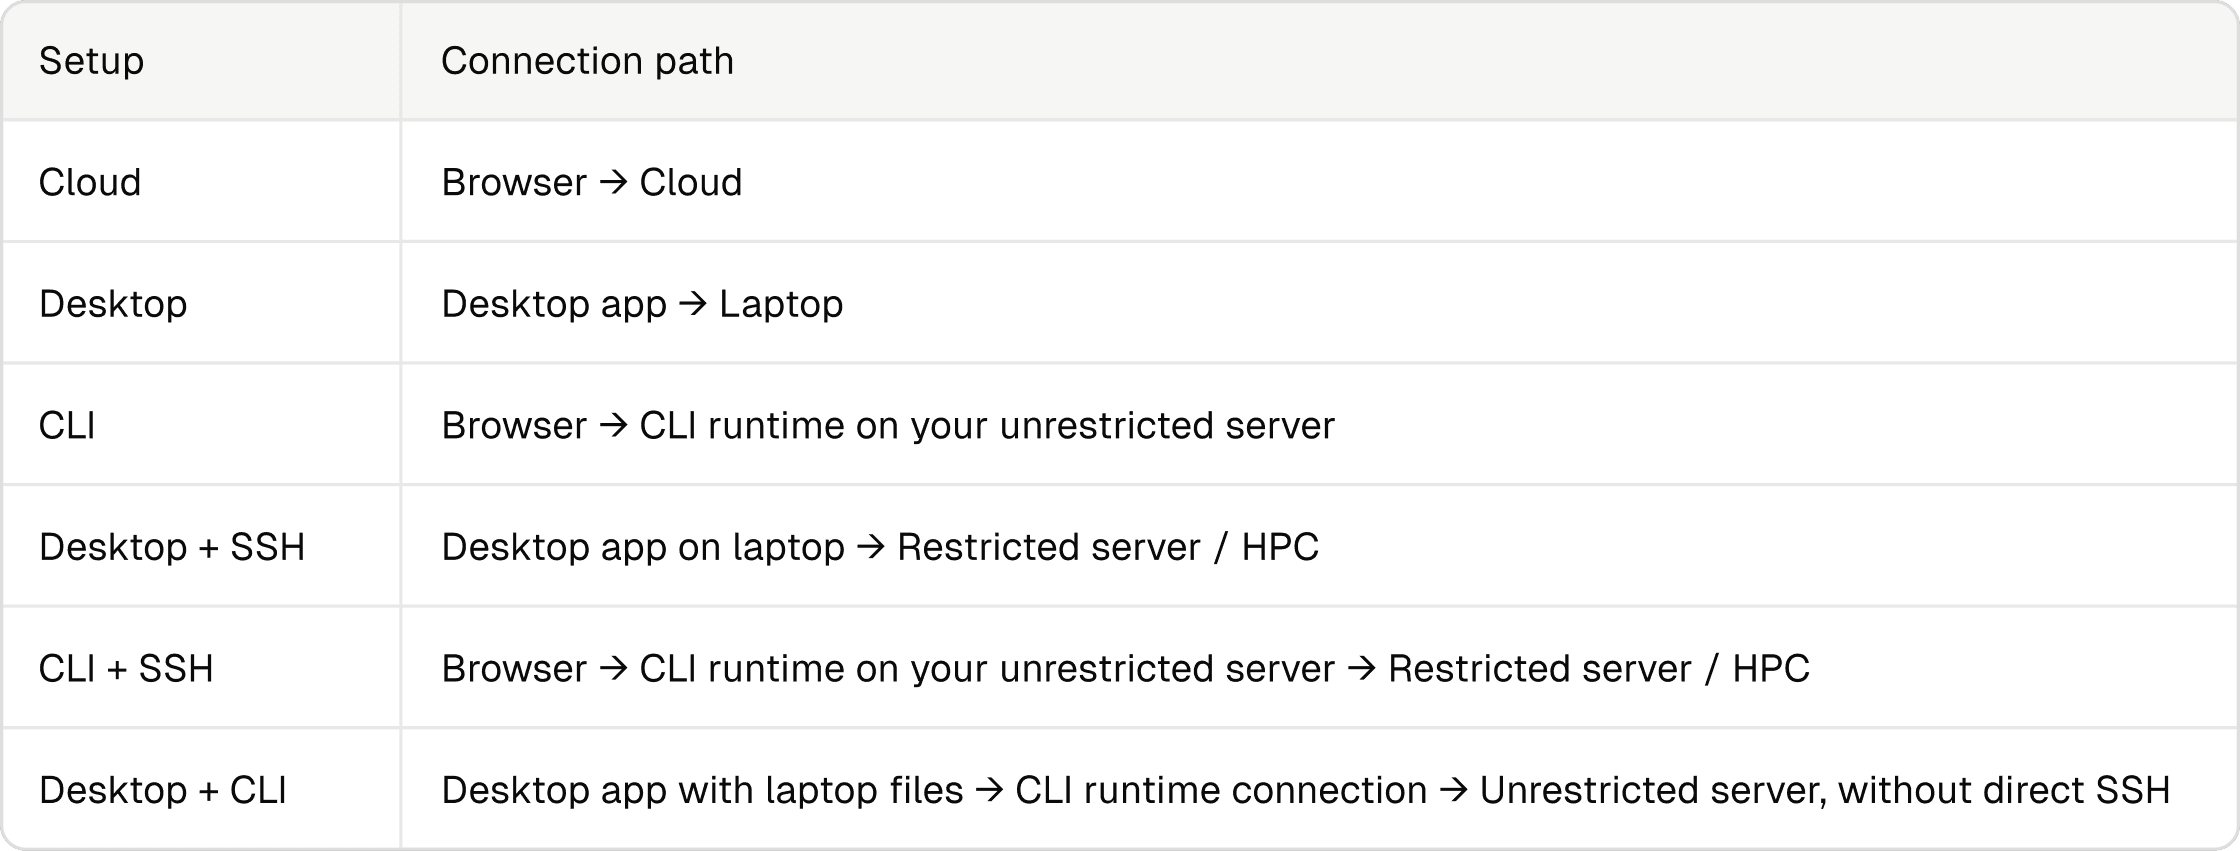
Desktop + CLI requires the runtime to be installed and connected on the unrestricted server. Use this setup when working from Desktop with laptop files and no direct SSH access to that server. Confirm that inputs are available to the server before running an analysis.
Choose one walkthrough
- Cloud: open Drylab in your browser. No runtime installation is needed.
- Desktop or Desktop + SSH: follow Section 2, including SSH/Slurm settings if you need remote access.
- CLI or CLI + SSH: follow Section 3. Configure SSH/Slurm during installation if you need remote access.
- Desktop + CLI: use Section 3 to install the server runtime, then select that runtime in Desktop.
2. Desktop walkthrough
Use this walkthrough for Desktop and Desktop + SSH. Everything in this section happens on your laptop or in the Desktop app.
Before you start
- Have access to your Drylab account and a laptop that supports the Desktop app.
- For SSH, have the target hostname, username, port if non-default, and authorized SSH credentials on your laptop.
- Confirm your laptop can reach the target through any required VPN.
- For Slurm, obtain the submission node, account, partition, and resource limits.
A. Install and open Desktop
- Download and install the Desktop app from the Drylab Desktop App download page. See Install the Desktop App.
- Open the app, sign in, and confirm it is ready to use.
B. Check SSH from your laptop
Open a terminal on your laptop and test your approved login. Replace this example with your target or configured alias:
ssh your-user@cluster.example.eduVerify the host identity with your administrator on first connection. Confirm the hostname and username after login, then exit. Resolve connection errors before continuing.
The remote target does not need Drylab or Docker for the SSH connection. It still needs the software and permissions required by your analysis.
C. Open Settings and enable SSH
-
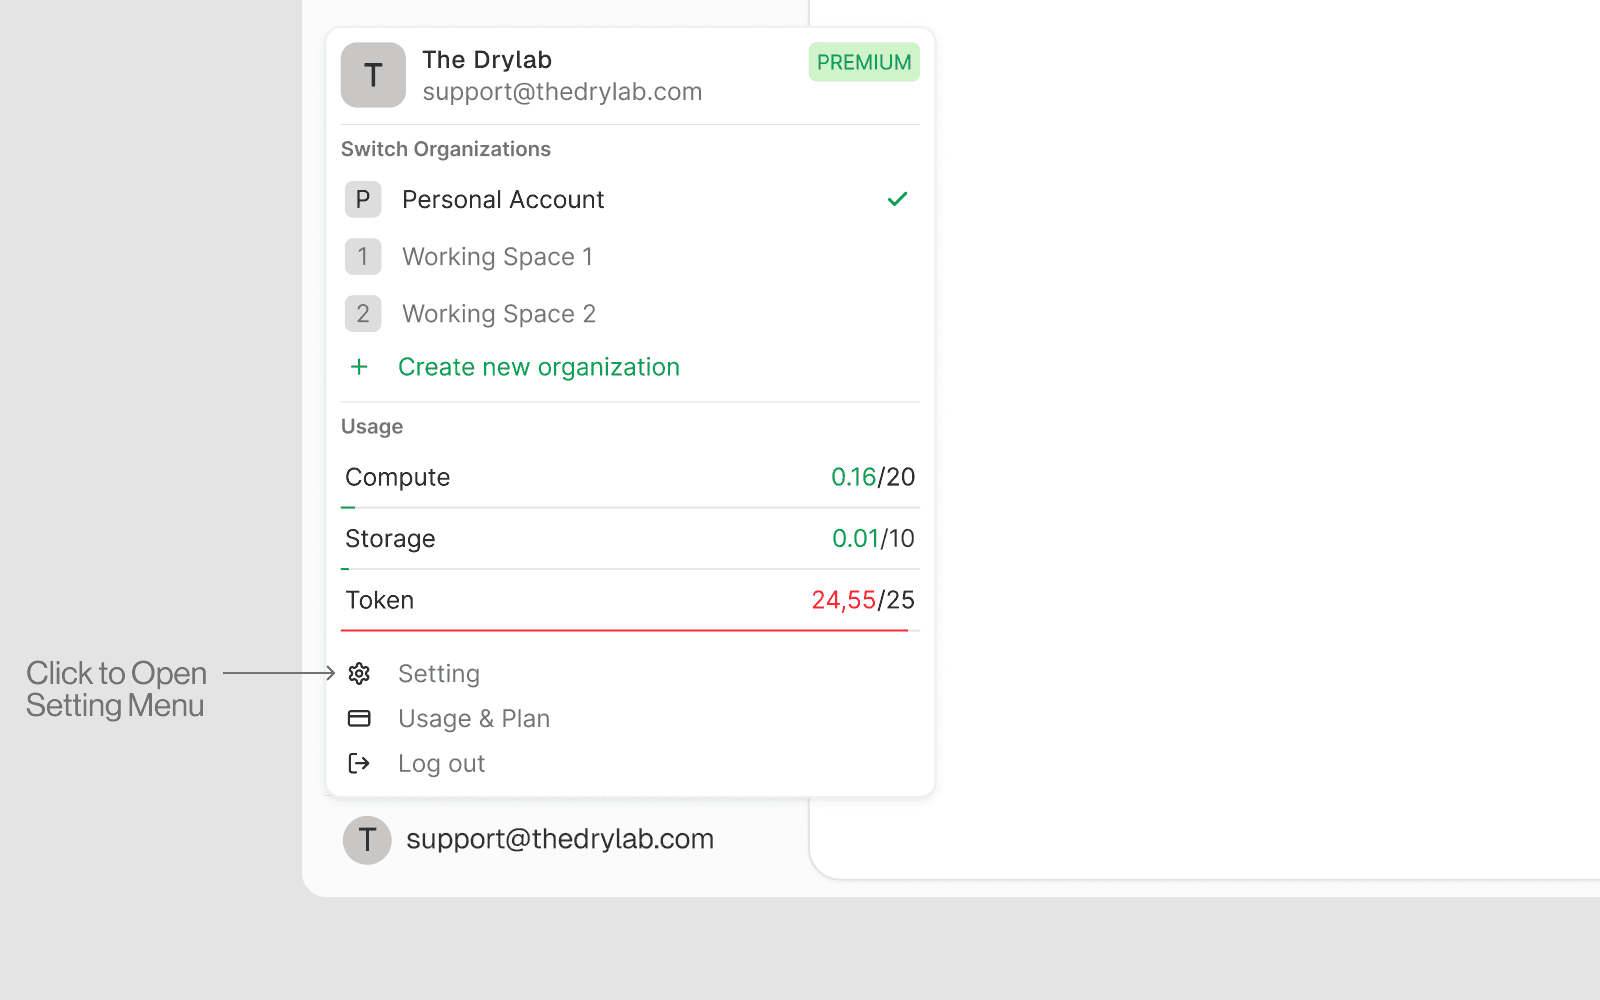
In the Desktop app, open the profile menu and select Settings.
-
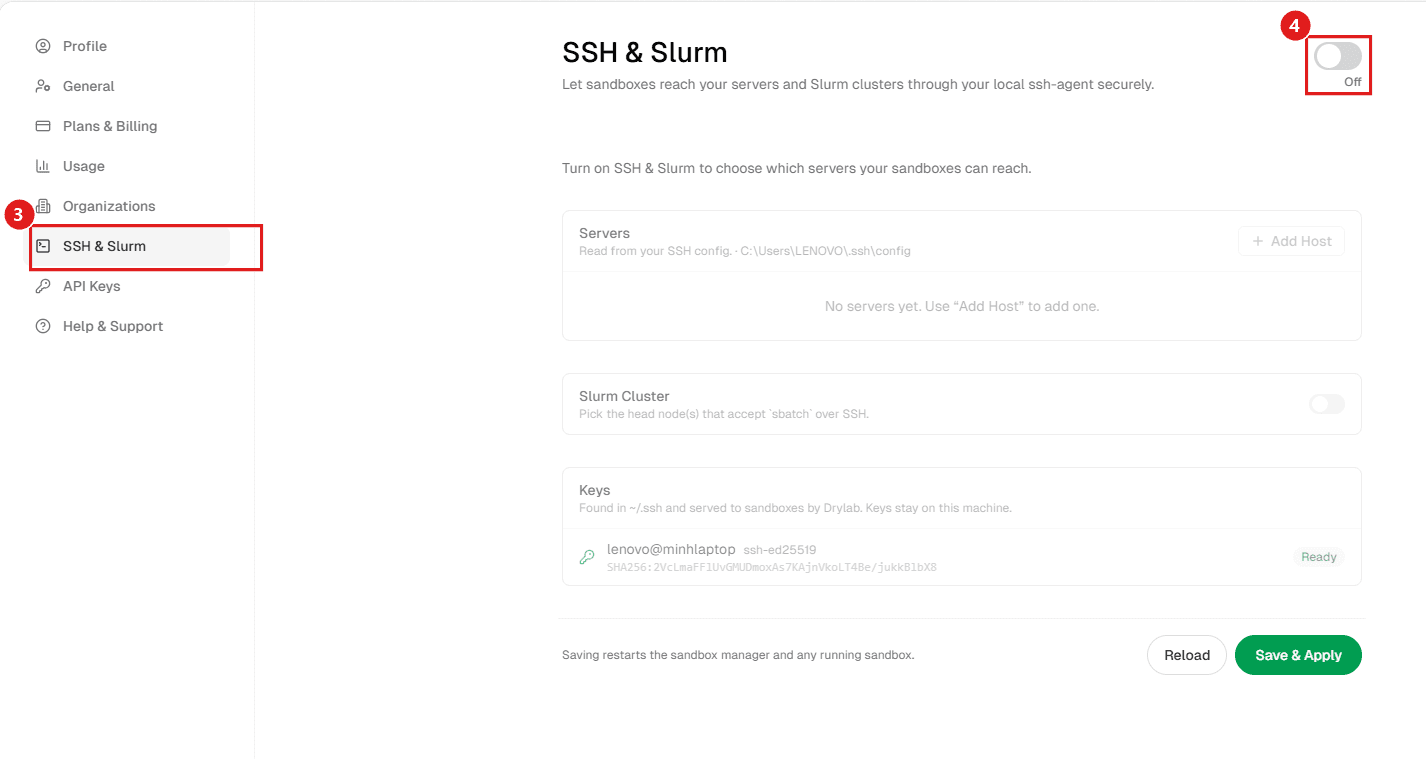
Select SSH & Slurm in the sidebar. This item only appears in the Desktop App. If you don't see it, restart the app to apply the latest update.
-
Turn on the toggle to enable access (it's off by default).
The Desktop app uses your laptop's SSH configuration and agent. Your laptop must remain able to reach the target.
D. Add your SSH hosts
-
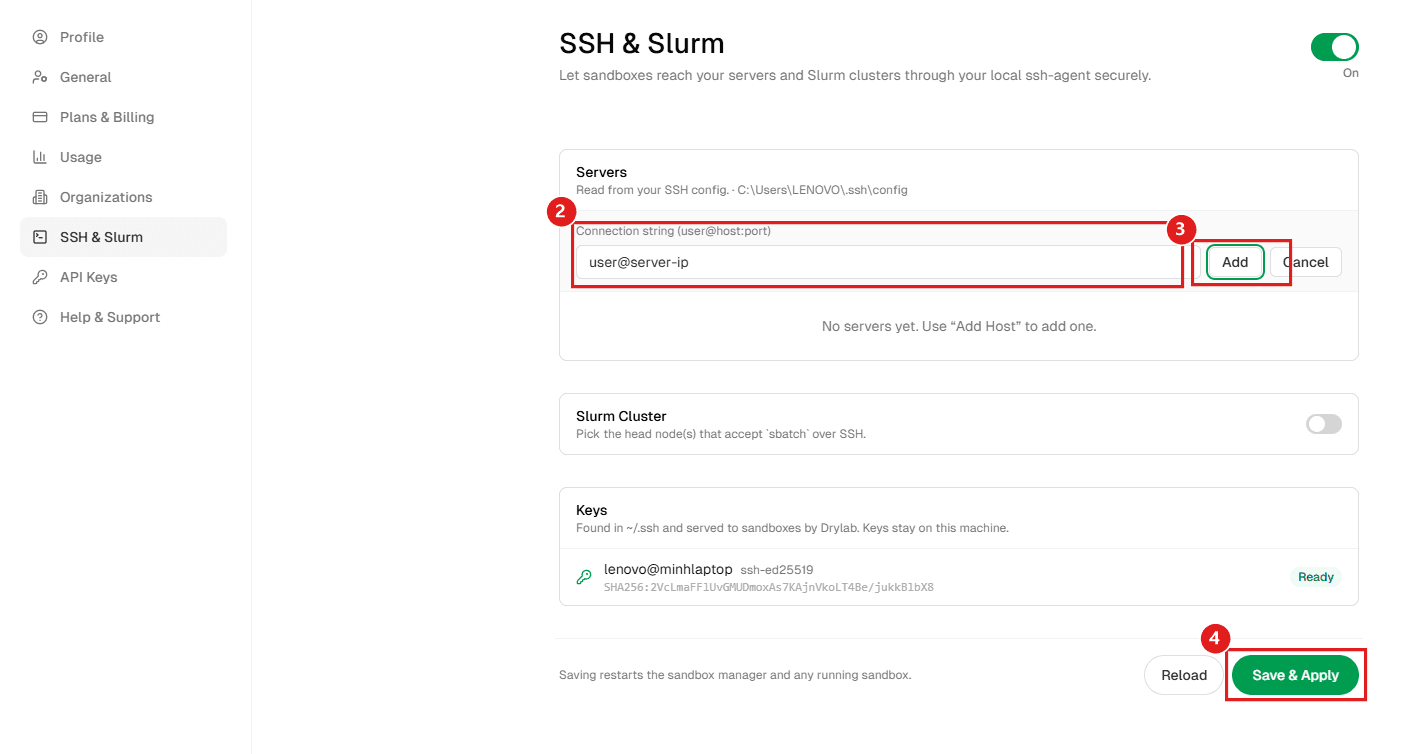
Under Servers, select + Add Host.
-
Enter the connection string, such as
your-user@server-ip, then select Add. -
Check that the expected key appears under Keys with Ready status. If a key is protected by a passphrase, click Unlock and enter it. The passphrase is remembered for this session only and is never written to disk, so you may need to unlock the key again later. Click Not now to skip.
Keys lists the keys found in
~/.ssh. They stay on your laptop. If your system's ssh-agent already holds keys, sandboxes use the agent instead, and the~/.sshkeys are listed for reference only. If all your keys come from the agent, the list can be empty and shows "Keys are provided by your system ssh-agent."; that's fine.
E. Configure Slurm, if needed
For an ordinary SSH server, leave Slurm Cluster disabled. For a Slurm cluster, enable it and select the head/login node that accepts scheduler commands.
F. Save and apply
Save your work, then select Save & Apply and confirm Apply & Restart. This restarts the sandbox manager and running sandboxes. If no project is open, the button reads Save and the changes apply the next time you open a project. Use Reload to re-read SSH configuration and keys after changes on your laptop.
G. Verify the connection
Use the laptop environment in Drylab and ask:
On my configured SSH target, report the hostname and username, then list the files in my project directory. Do not start an analysis yet.
Once the check succeeds, continue to Section 4 for files, commands, jobs, and results. You do not need to follow the CLI walkthrough.
3. CLI walkthrough
Use this walkthrough for CLI and CLI + SSH. Run the installation command on your server, then use Drylab in your browser at app.thedrylab.com to connect to its runtime.
Before you start
- Have a terminal or approved console on your server and permission to install the runtime.
- Confirm the server can reach Drylab services and has a writable workspace.
- For SSH, configure authorized credentials and any required VPN on this server.
- Confirm SSH works from this server to the target. Access that works only from your laptop is not sufficient.
- For Slurm, obtain the submission node, account, partition, and resource limits.
For remote access, test your SSH login in a terminal on your server before installing:
ssh your-user@cluster.example.eduReplace the example with your target or alias. Verify the host identity on first connection, confirm the hostname and username, and exit.
The remote target does not need a Drylab installation for the SSH connection. The Drylab runtime is installed on your server, which connects to that target.
Desktop + CLI: use this same server installation workflow, then select the connected runtime in Desktop. You or an administrator need a way to run the installer on the server even when direct SSH from your laptop is unavailable.
A. Open Settings
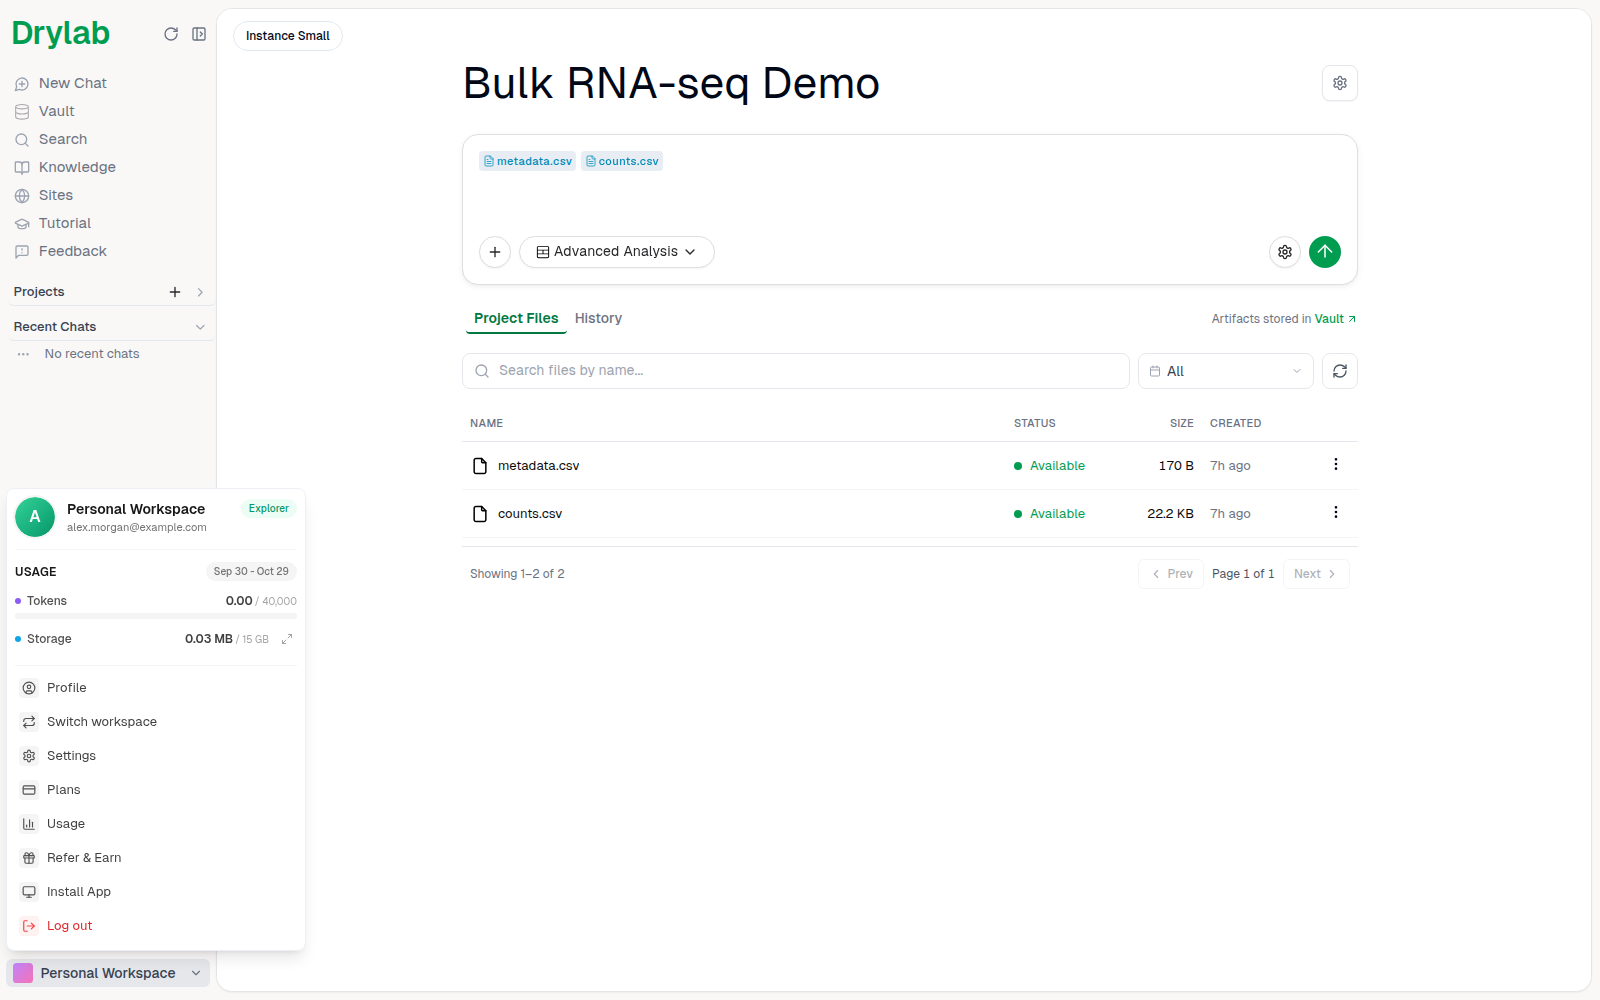
- Open Drylab in your browser and click your workspace at the bottom of the left sidebar.
- Select Settings.
B. Go to Local Compute
- Select Local Compute in the settings sidebar.
- Click Create new to open Create a local runtime.
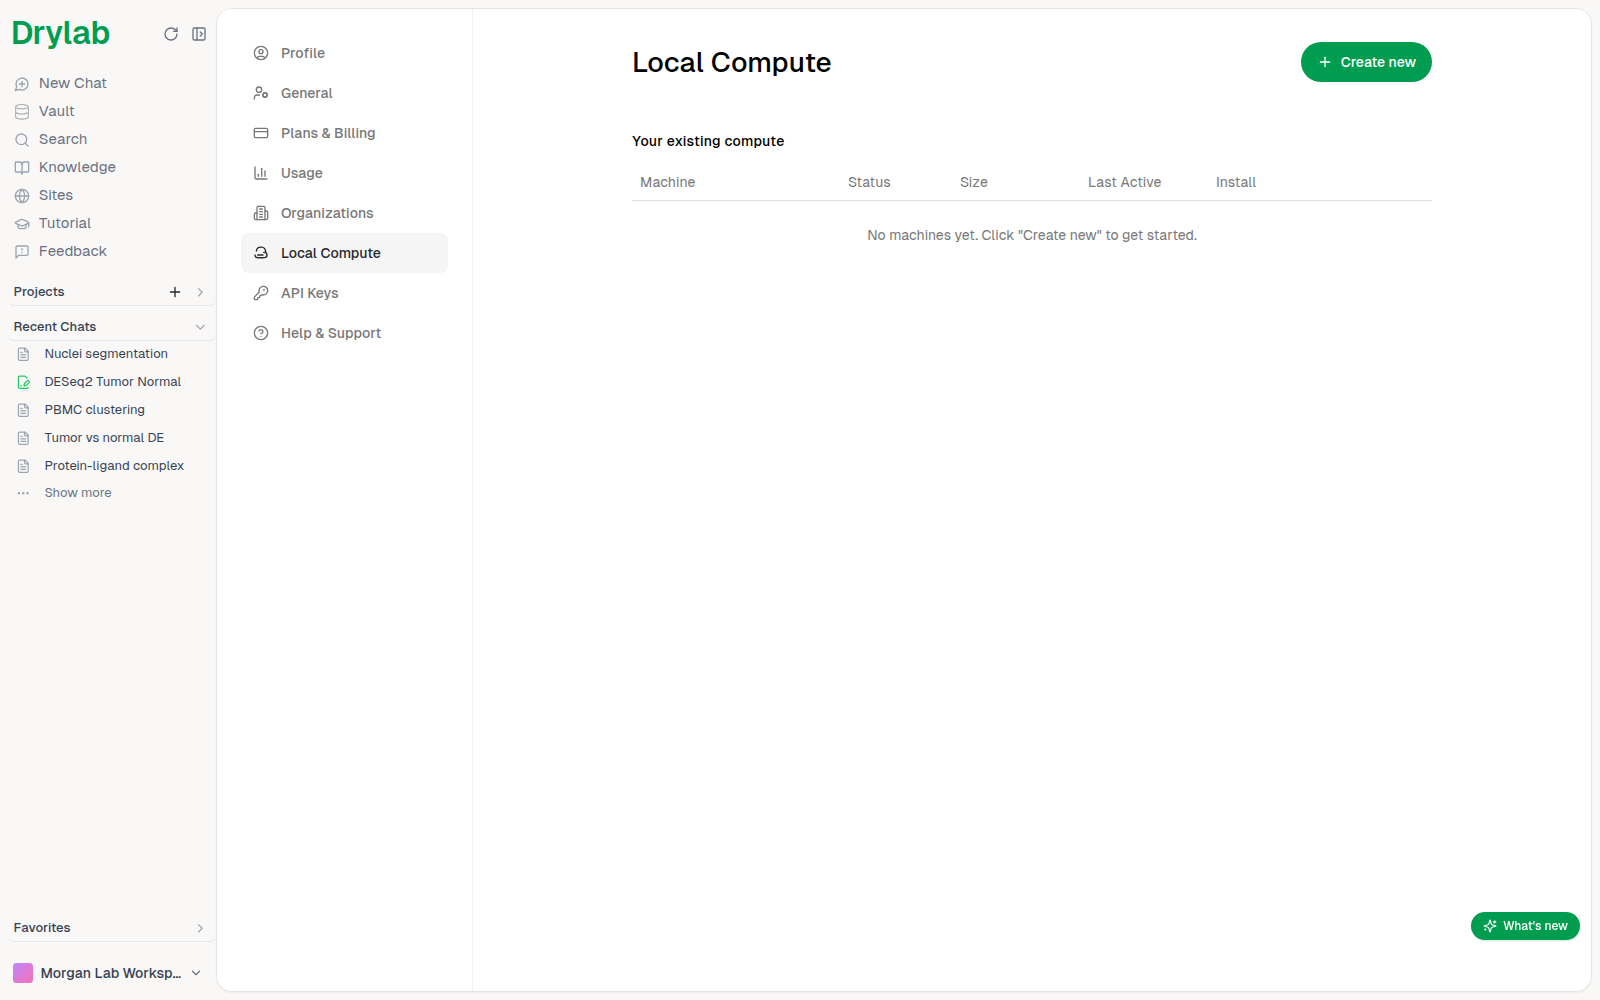
C. Generate and copy the installation command
- Enter a Machine name, such as
Lab Server. - Choose a Docker image: Drylab Notebook, or Drylab Notebook GPU for a Linux server with an NVIDIA GPU.
- Set Choose GPU machine to Yes if your server has CUDA GPUs.
- Click Generate install script.
- Click the copy icon beside the command under Run the install command in terminal.
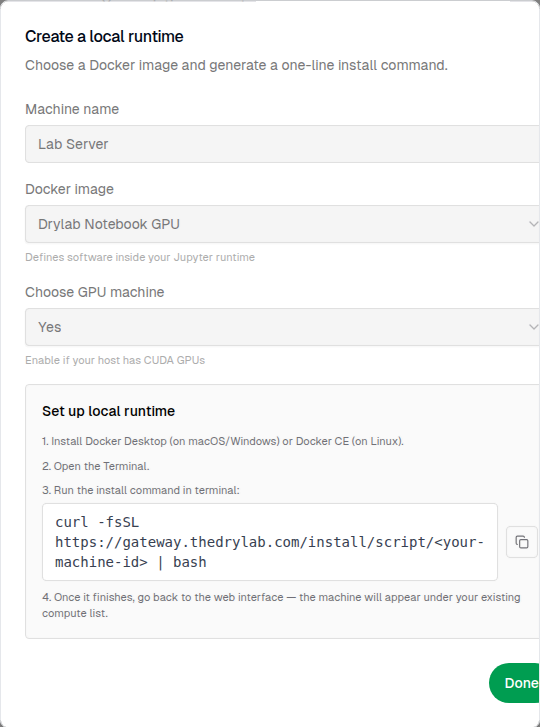
D. Run the command on your server
- Open a terminal on your server.
- Paste and run the command copied in step C.
- Follow the installer checks and enter a Workspace path: a writable folder on that server.
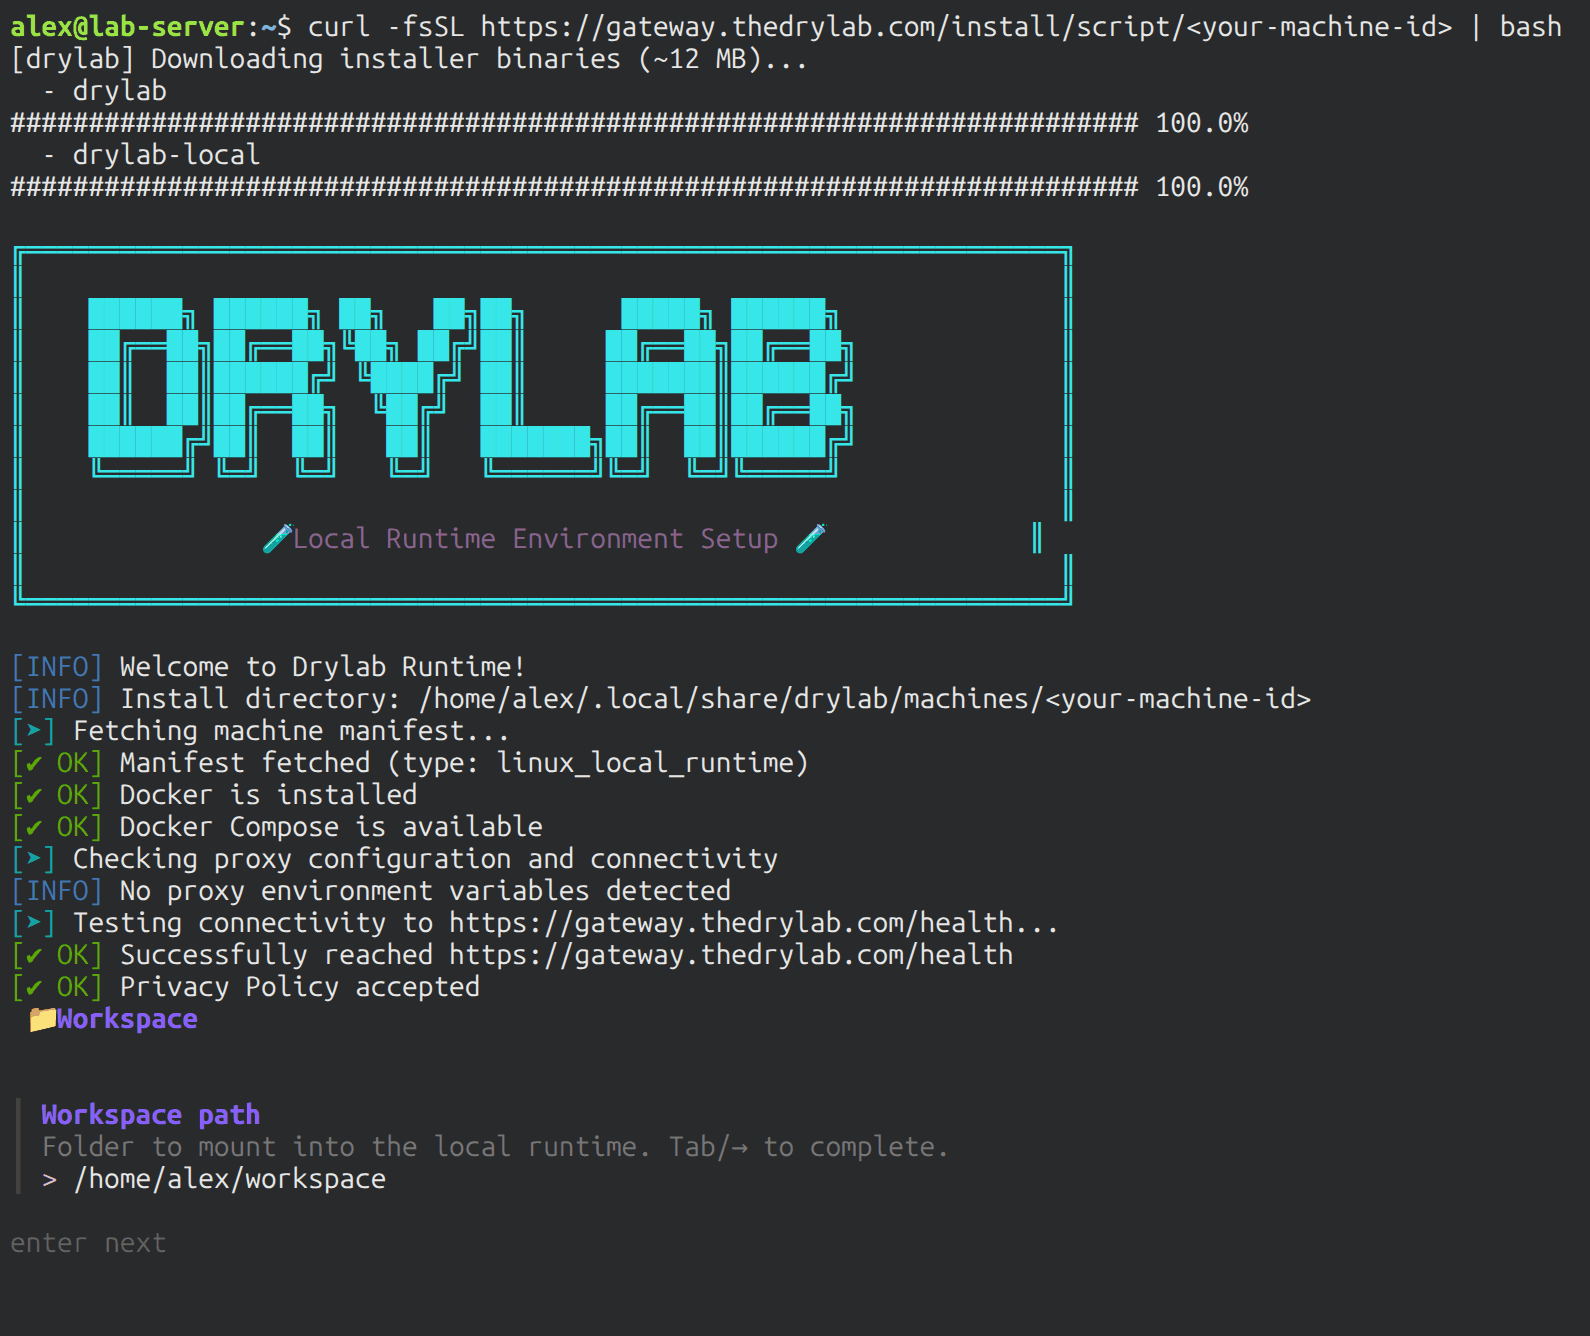
The supplied Linux installer checks Docker, Docker Compose, and connectivity. Resolve failed checks before continuing. The workspace belongs to this server, not your laptop or a separate SSH target.
Set up SSH/Slurm during installation. Continue with steps E and F while the installer is running. For CLI without an SSH target, answer No to the SSH and Slurm prompts, then continue to step G.
E. Enable SSH and choose hosts
-
At Allow sandboxes to reach SSH hosts via a scoped agent?, choose Yes.
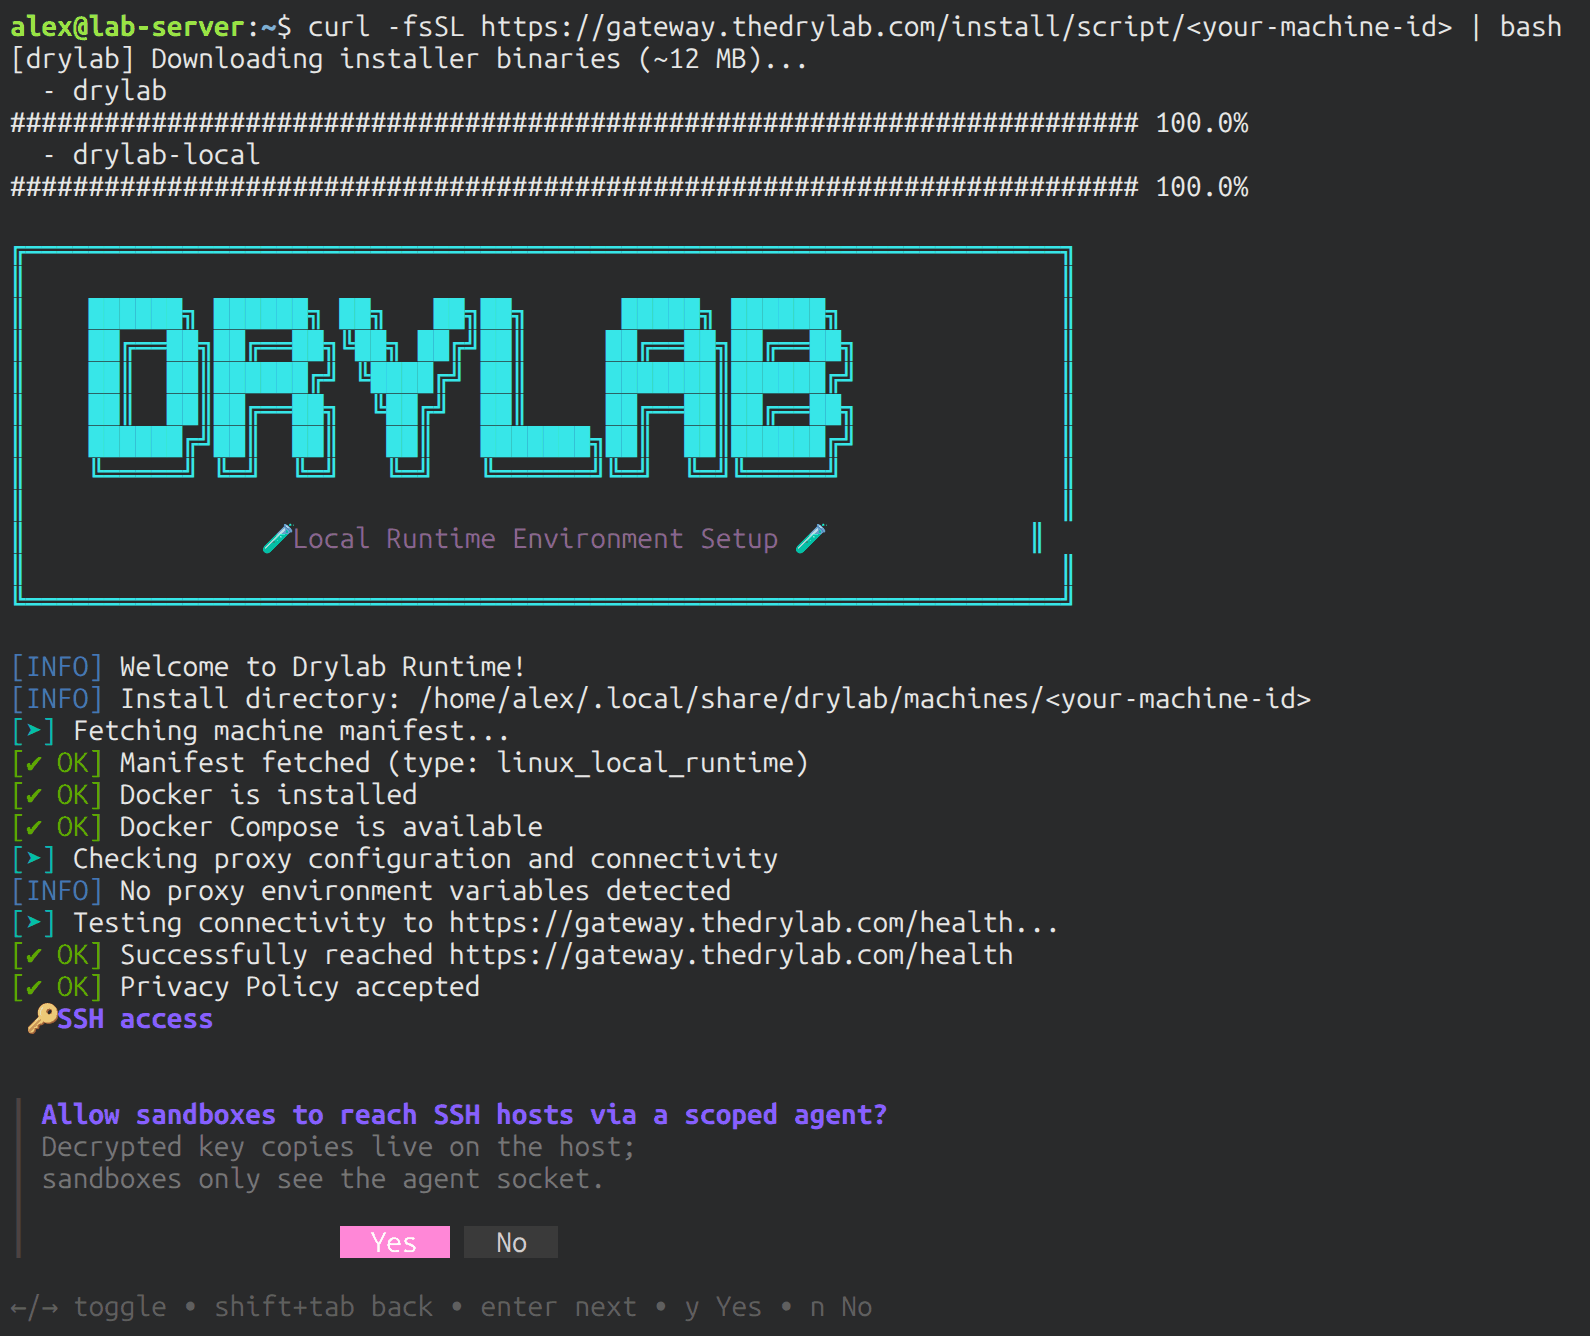
-
On Select SSH hosts to allow, press Space to select the required targets.
-
Use + Add a host not in ~/.ssh/config… if your target is missing, then enter its Connection string (for example
your-user@cluster.example.edu). -
Press Tab to continue. (Space or Enter toggles the highlighted host.)
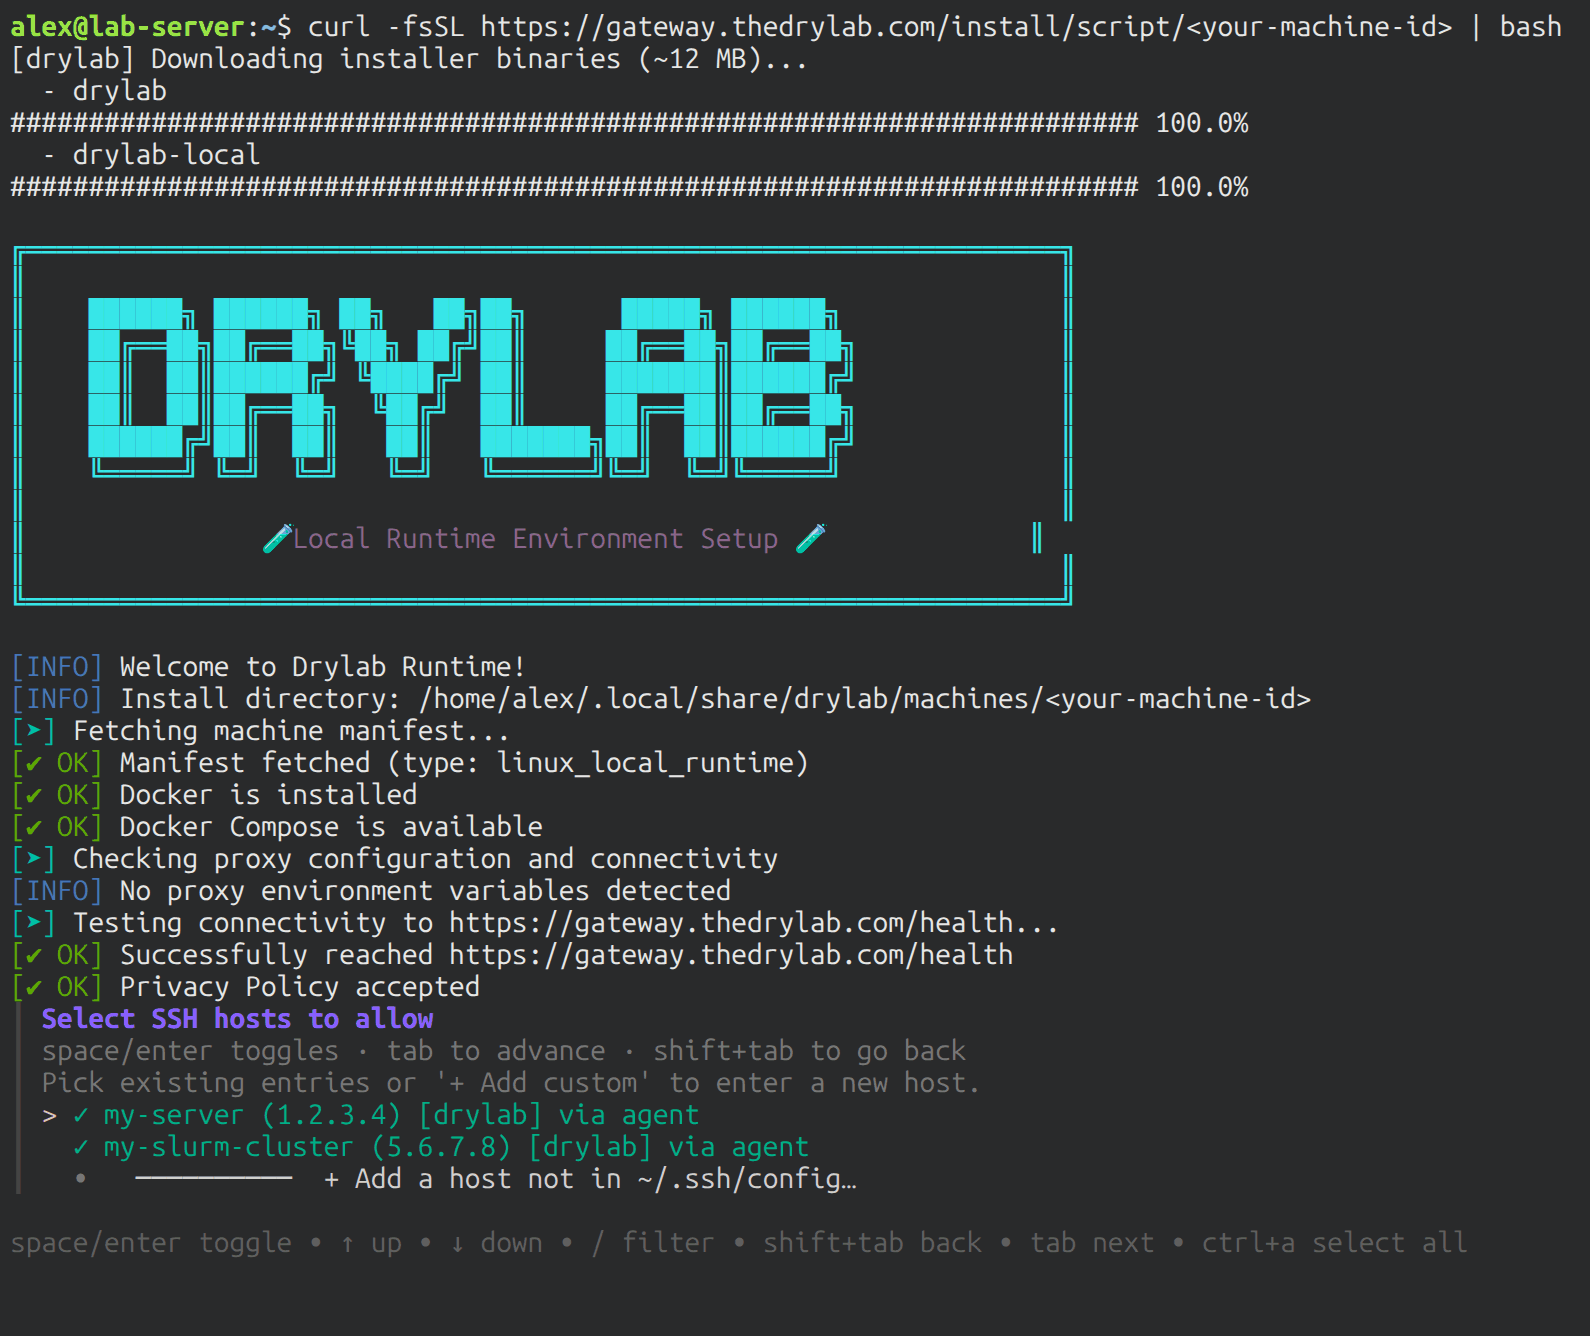
These hosts, keys, and the SSH agent belong to the account running the runtime on your server. Laptop keys are not automatically available there.
F. Configure Slurm, if needed
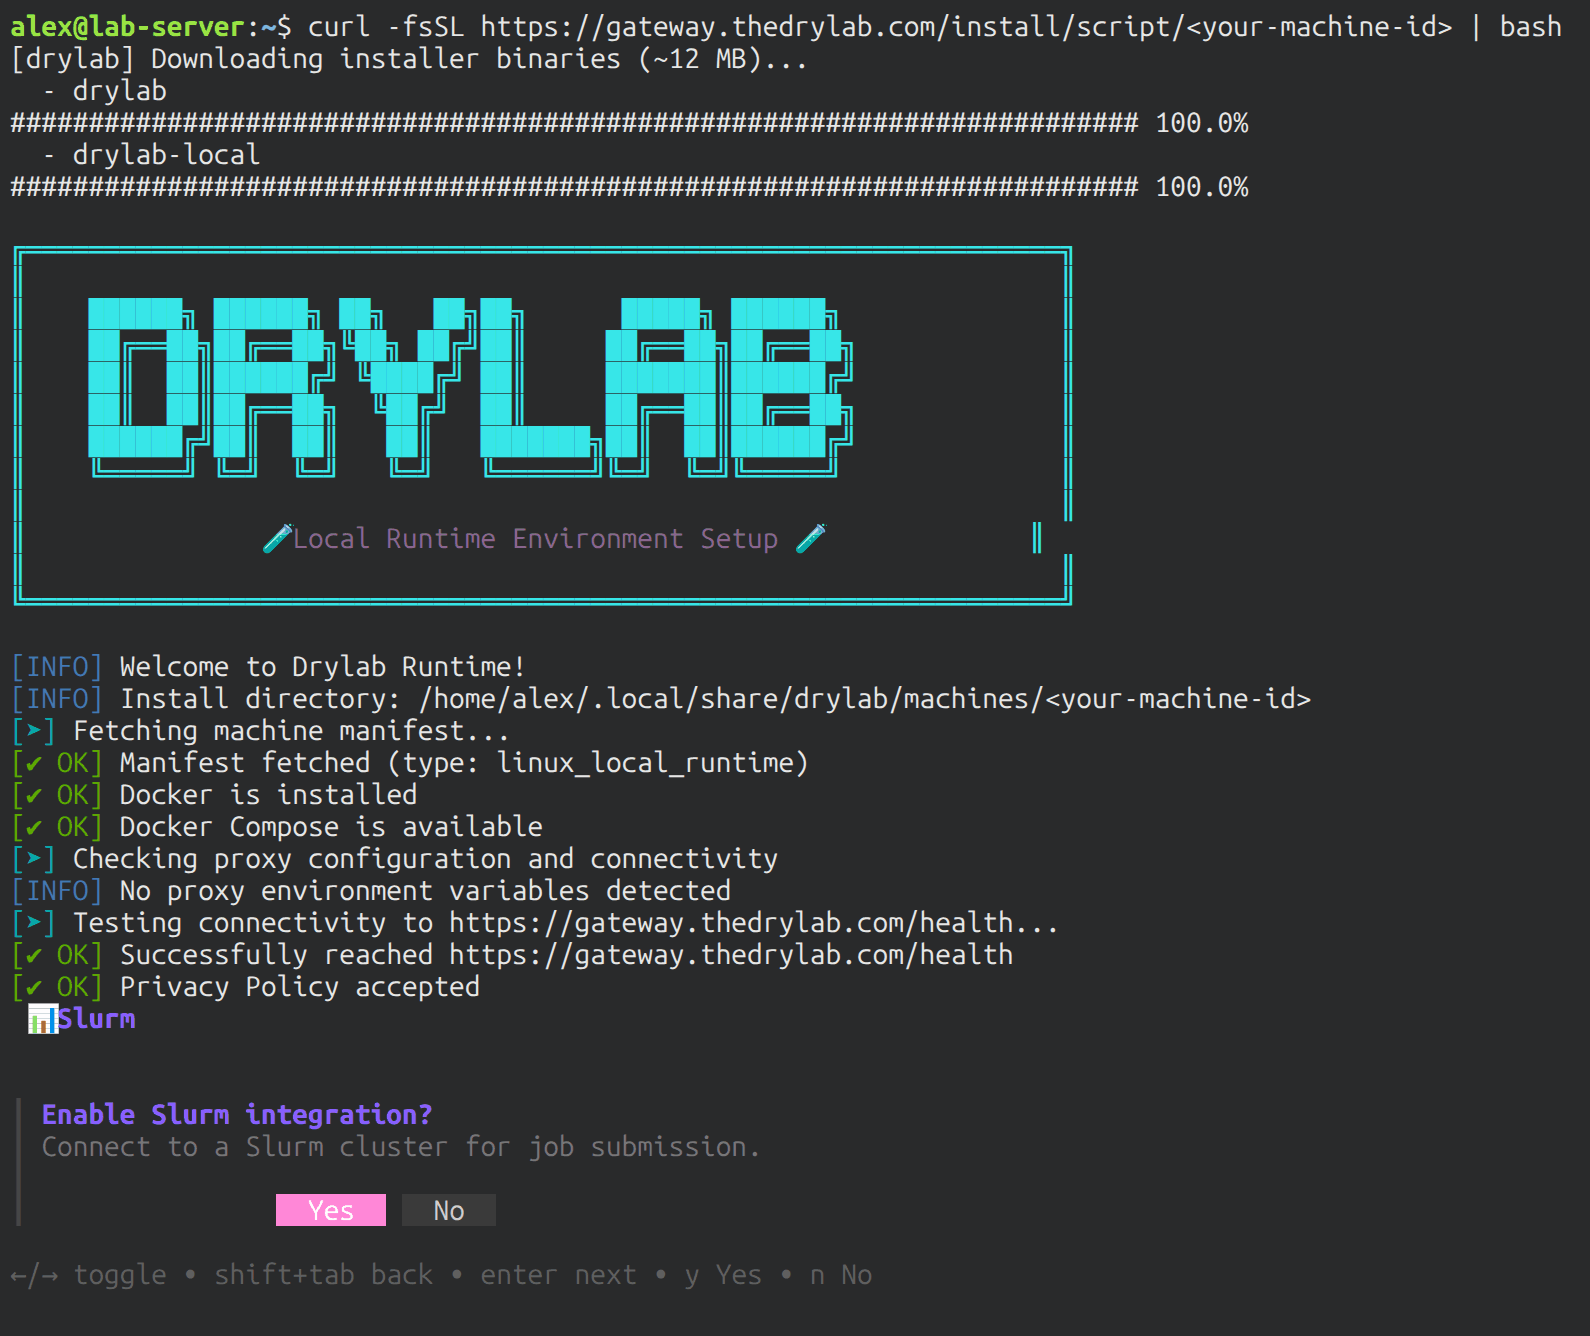
For an ordinary SSH server, choose No at the Slurm prompt and continue to step G.
-
For a Slurm cluster, choose Yes at Enable Slurm integration?
-
At Slurm connection mode, choose how Drylab talks to the scheduler:
- SSH to head node: run Slurm commands over SSH on a login node.
- REST API: use your cluster's Slurm REST API; you'll be asked for the Slurm REST API URL and a Slurm User Token.
-
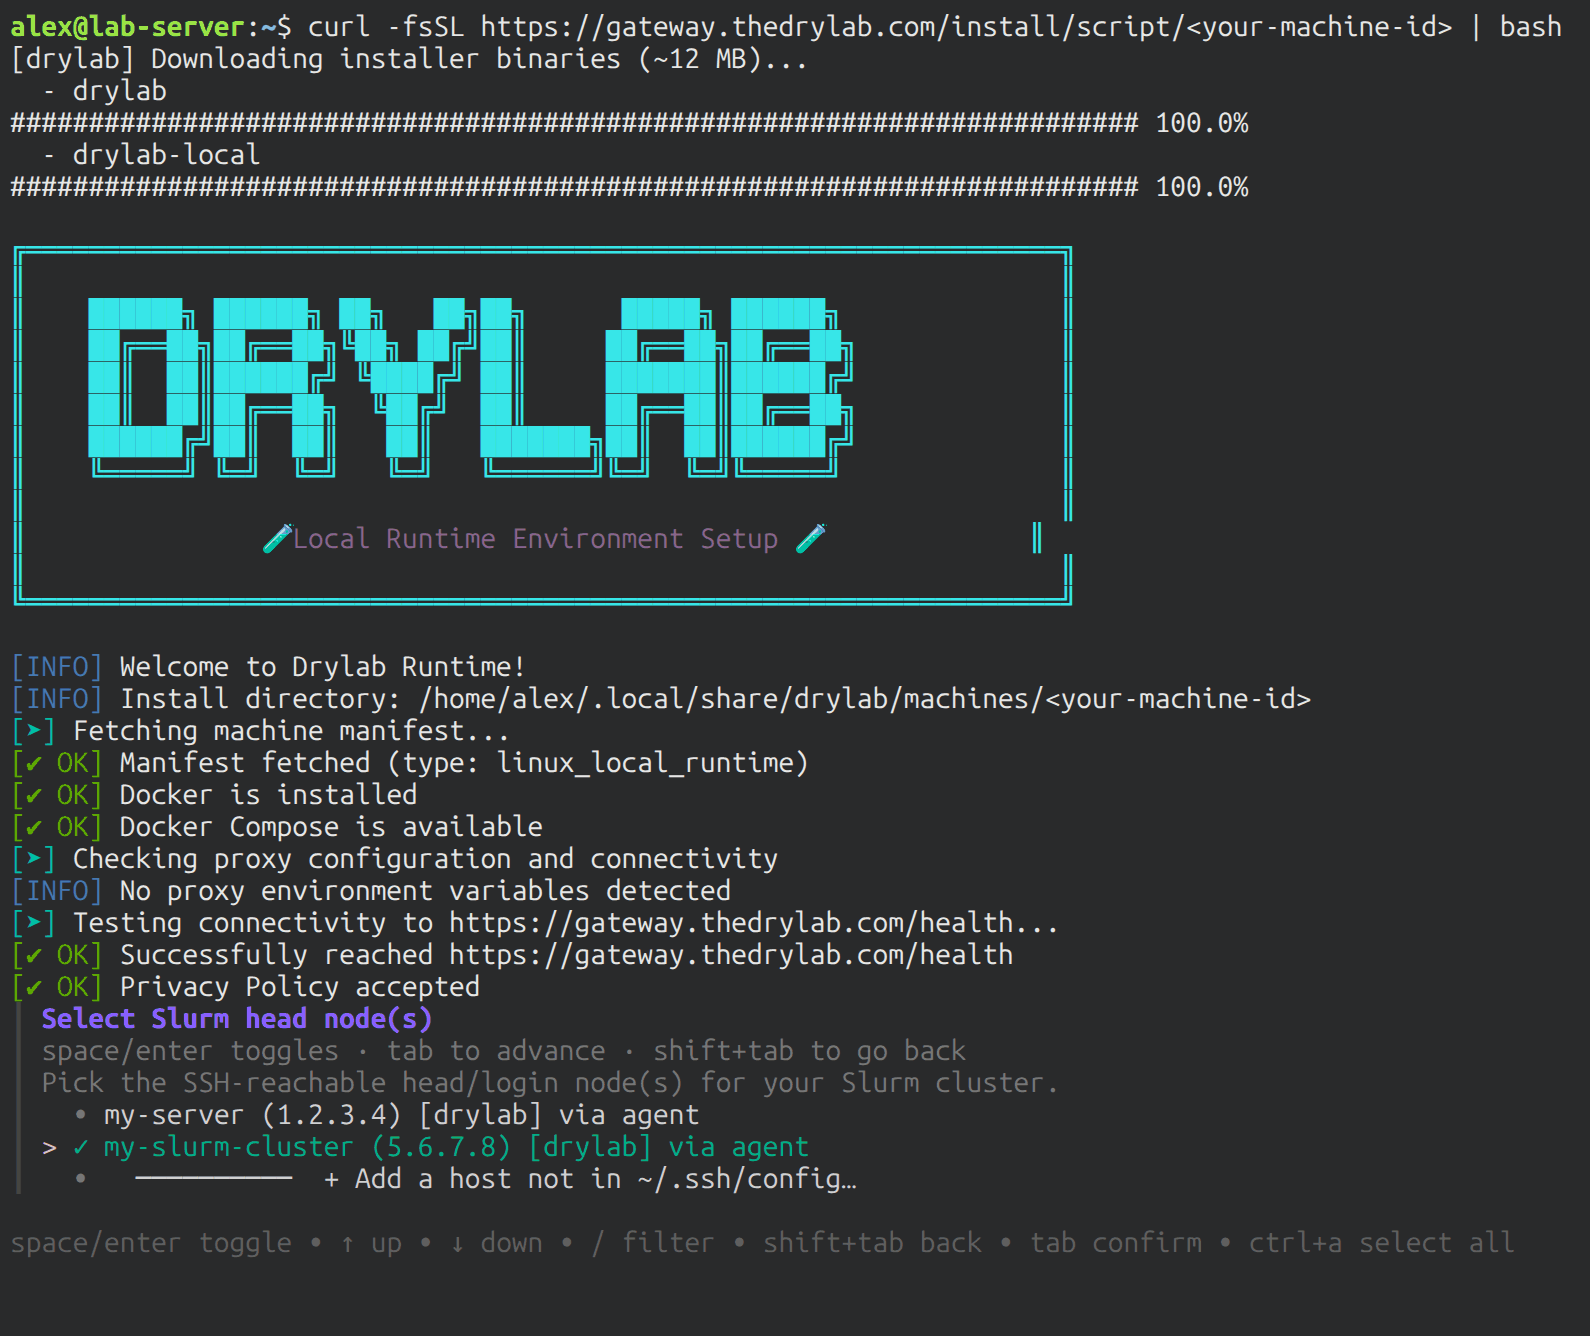
For SSH mode, on Select Slurm head node(s), press Space to select the node that accepts scheduler commands.
-
Press Tab to confirm.
G. Complete installation and select the runtime
- Finish the remaining installer prompts.
- Return to Local Compute in Drylab.
- Check that your server under Your existing compute changes from disconnected to pending, then active.
- In your analysis, open Select Sandbox and select that server under Local Runtime.
H. Verify the connection
For CLI without SSH, check the runtime itself:
On the selected runtime, report the hostname and working directory, then list the workspace files. Do not start an analysis yet.
For CLI + SSH, check the configured target:
On my configured SSH target, report the hostname and username, then list the files in my project directory. Do not start an analysis yet.
Once the check succeeds, continue to Section 4 for files, commands, jobs, and results. You do not need to follow the Desktop walkthrough.
4. Work with your server or HPC
Explicitly tell the Drylab agent where it should do the work whenever you start a task. For example:
- Do this work on my laptop.
- Do this work on my selected server runtime.
- Do this work on my configured SSH target.
- Submit this work to my configured Slurm cluster.
5. Troubleshooting
Desktop
| What happened? | What to check |
|---|---|
| The SSH host is missing | Add it under Servers. Use Reload after changing SSH configuration on your laptop. |
| A key is missing or not Ready | Check the SSH key and agent on your laptop, then Reload. |
| Settings changes do not take effect | Save your work, then select Save & Apply. This restarts the sandbox manager and running sandboxes. |
CLI
| What happened? | What to check |
|---|---|
| The runtime stays pending or disconnected | Check installation output and your server's connection to Drylab services. |
| SSH works from the laptop only | Test from your server; check that server's network route, SSH configuration, and agent. |
| SSH/Slurm was not configured | Configuration is available during CLI installation. The Desktop settings panel does not configure the CLI runtime. |
| Commands run on the wrong machine | Check the selected runtime and request its hostname. |
Shared connection and job checks
| What happened? | What to check |
|---|---|
| Permission denied | Test SSH from the machine running Drylab; check the username and authorized public key. |
| SSH times out | Check the VPN, firewall, hostname, and port from that machine. |
| Slurm commands or jobs fail | Confirm the submission node, scheduler environment, account, partition, resource limits, and logs. |
| A file is missing | Identify whether its path belongs to the laptop, runtime server, or SSH target. Transfer it if needed. |
Access and credentials
Drylab uses your existing SSH account permissions and network routes. Provide the public key to your administrator when authorization is needed. Do not distribute the private key or paste it into chat.
Removing a host from Drylab's configuration limits Drylab's access; revoking the SSH credential itself requires changing authorization on the target.